
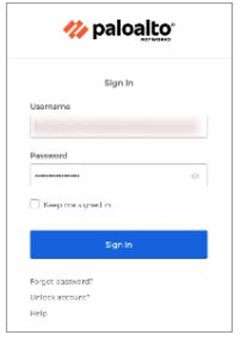
Palo Alto Support Portal
Based in Santa Clara, California, Palo Alto Networks is an international cybersecurity business of American origin. It is renowned for providing cutting-edge security solutions that protect networks, especially in settings that heavily rely on the cloud.
The company’s main product, the StrataTM Network Security Platform, uses AI and Zero Trust principles to defend customers’ data against various threats.

Palo Alto Support Portal Registration
Here’s a step-by-step guide to creating a user account for the Customer Support Portal (CSP) to get Palo Alto Support portal registration, ensuring you’re fully prepared for the process.
Step 1: Access the Customer Service Portal and click on Create a New Account.
Step 2: Provide your email address
Step 3: Verify the validity of your email address
Step 4: Register the item
Step 5: The account on CSP
Step 6: Welcome to the Portal for Customer Support
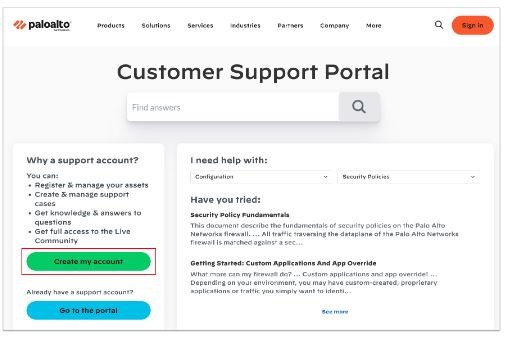
Step 1: Access the Customer Service Portal and click on Create a New Account
Click the “Create my account” option after visiting Palo Alto Customer Service Portal.
Step 2: Provide your email address
- Enter your email address
- Enter the Captcha
- Click the ‘Next’ button.
3. Verify the validity of your email address
- CSP emails an Activation Code to your inbox in order to verify your email address.
- After inputting the email’s activation code, press the Next button.
Step 4: Register the item
- To register a product, choose one of two choices.
- To register the hardware PA-Series firewalls, for example, use the product’s serial number, authorization code, customer ID, and parent order number.
- Usage-based VM-Series goods that can be registered are those that were bought from Cloud Security Service Providers (CSSP).
These products can be purchased from one of the following public cloud marketplaces:
- AWS, or Amazon Web Services
- Microsoft Azure
- Cloud Security Service Provider, or CSSP
- Google Cloud Platform
- Cloud NGFW products offered by AWS
- Cloud NGFW products: Azure Cloud NGFW
Enter product details such as the tenant ID and serial number. After completing the captcha, click the Next button.
Step 5: Your CSP Account
Your CSP Account is a part of the Customer Support Portal
New CSP Account
If you do not currently have a CSP account, submit your company name, address, and contact details first and press the Next button to establish one.
CSP Account Holder
CSP offers you a second choice to utilize one of the CSP accounts if you are already a CSP account holder (i.e., your email address is already registered).
Choose the option ‘add me to existing support account.’
Register your product by logging into the CSP account and following the instructions.
- Add the company’s details.
- Enter the details of your business to create a CSP account, then click the Next button.
- Put in your user details.
- Enter your user contact details now.
- Press the Verify Address button.
- Check the details of your contact.
- Examine your contact details.
- Examine your contact details and make any required edits.
- After confirming that the information you provided is correct, click the Register button.
Step 6: Welcome to the Portal for Customer Support
Congratulations on creating a new CSP account or logging into an already-existing one. You will receive an email with login instructions for CSP after you are accepted.
Palo Alto Support Portal SSO
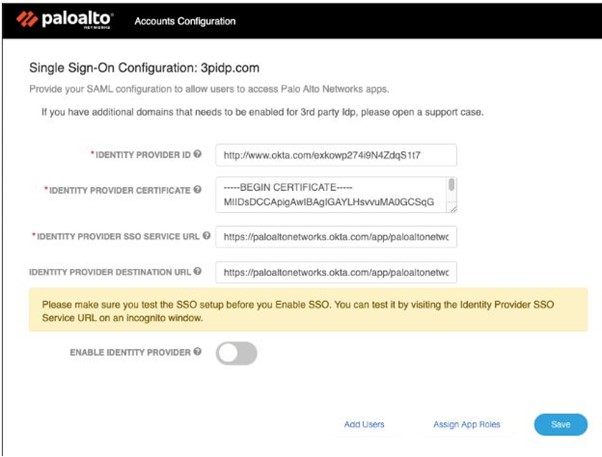
- Go to the Account Details page in the CSP and select View Single-Sign-On (SSO) Settings of Palo Alto Support portal for your domain to activate a third-party Idp.
- Identity Provider information site will be be accessed by other users when you add user to your Palo Alto poratal.
- After filling out the form with your Identity Provider information, click “Save.”
- The Palo Alto Networks Service Provider Information will appear near the bottom of the page when you save the setup.
- With the Palo Alto Networks information on the page, modify your identity provider.
- The information needed to be provided to the SAML configuration is listed below.
- Name Id
- Value: To send an email address in the Name Identifier
- Format and configure it as follows: Set the “Unspecified” format for the Name ID.
- Further SAML Features: The extra SAML properties are listed below.
- FirstName: User name: First Name of the user Last Name of the user
- Claim name: The nameId, or unique user identity, needs to be changed to user mail while maintaining the “Unspecified” format.
- Enter the Identity Provider SSO Service URL in an incognito window.
- Enter your enterprise credentials to log in to your identity provider.
- Identity Provider will send a SAML to Palo Alto Networks Service Provider following a successful login.
- The home page of sso.paloaltonetworks.com will be displayed to you if the SSO handshake was successful.
- You can “Enable SSO” once you’ve confirmed that SSO functions as intended.
- It will allow all users within that email domain to use the Identity provider.
Palo Alto Support Portal Roles
Several user roles are available on the Palo Alto Networks support portal:
- Super User
- Standard User
- Limited User
- Threat Researcher
- AutoFocus.
For user accounts, roles are required; for service accounts, roles could be optional.
Users can be assigned various roles that may enable them to access particular applications and functionalities of the portal.
Palo Alto Support Portal API
- In order to use the Palo Alto Support Portal API, first log in to the Support Portal using your mail ID and password
- Choose “Products,”
- Go to “API Key Management.”
- You may manage the API keys for different Palo Alto Networks products, including Threat Vault and licensing, in this section.
Palo Alto Support Portal MFA
Two Two-factor authentication (2FA) or multifactor authentication (MFA) is a requirement set by Palo Alto Portal Networks. MFA allows consumers to access the Customer Support Portal (CSP) and other apps.
A code must be entered by users in order to log in.
Palo Alto Support Portal Reset User Password
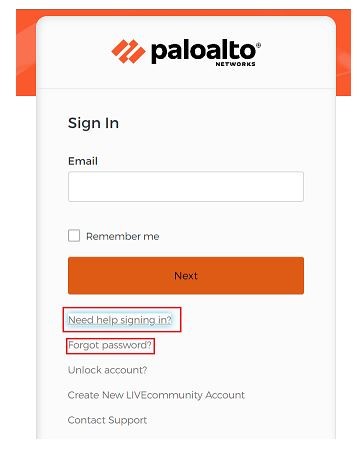
- Go to the Support Portal.
- On the Support page, select Sign In in the upper right corner, or click the blue Navigate to the gateway button located in the page’s lower left corner.
- Click Do you need assistance logging in?
- Choose Forget Your Password?
- Choose Reset by Email after entering your SSO email address.
- Your mail address receives a link to reset your password.
- Click the link in the email to reset your password.
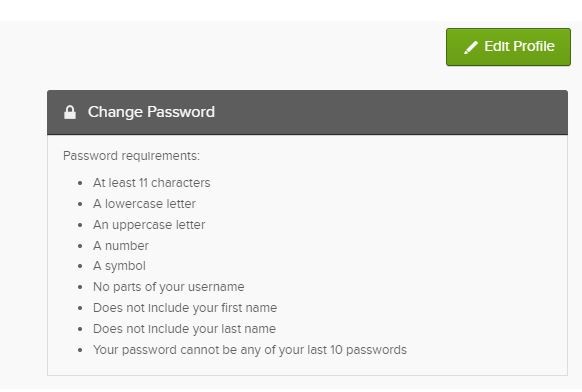
- In the “New password” form, type your new password of choice.
- In the “Repeat password” field, double-check your entry.
Palo Alto Support Portal Reset MFA
- To reset your multi-factor authentication (MFA) for the Palo Alto Networks support portal, you must have someone with admin access.
- Alternatively, you can use your unique user credentials to log in to the Palo Alto support portal and modify your default 2FA method.
- After logging in, choose the MFA option in ‘settings’ and reset it.
- For security reasons, you should always verify important account information twice.